Hiking the Window Trail in Big Bend National Park
Peter BrahanThe Window Trail is just one of the great spots in Big Bend National Park’s Chisos Basin Area. This place is packed full of great places to explore. In addition to other great hikes in Big Bend National Park, such as breathtaking Lost Mine Trail, the challenging 9.3-mile Emory Peak Trail or the toddler friendly 2.2-mile Grapevine Hills Trail, the Window Trail is a great way to spend a few hours in the Basin. This moderately challenging, out-and-back hike features a stroll through a valley on the way to a “pour-off” with impressive views, making it a great place for photos. If you have a few hours, make sure you take the time to explore this fantastic trail!
WINDOW TRAIL DETAILS
- Difficulty: Moderate
- Distance: 5.5 miles (round-trip)
- Trail: Out-and-back
- Elevation gain: 984 feet
- Peak elevation reached: 5,380 feet
- Best time of year to hike: Fall through spring
- To beat the crowds: Arrive before 8:00 am or after 3:30 pm
- Footwear: Hiking boots
- Watch out for: Sun exposure
- Restrooms: Located at the trailhead, but not on the trail
- Pets: Not allowed
- Time needed:5 hours

The Window Trail is one of many hikes and sights highlighted in our 16+ page itinerary for Big Bend National Park.
PARKING AND TRAILHEAD FOR THE WINDOW TRAIL
There are two main options for parking for the Window Trail. If you choose to hike the long route, which is 5.5 miles with a total climb of nearly 1000 feet, the trail can be accessed aside the convenience store near the Chisos Basin Lodge. Here, there is a parking lot with nearly 100 spaces. While the parking lot can fill up, many people who are park here are going in and out of the Chisos Basin Visitor Center or the convenience store. This means that if the lot is full and you are not able to find a spot, you just need to wait a few minutes and a space will open up.
If you want to shave off about 1.9 miles (for a total hike of 3.6 miles and a total elevation gain of 500 feet), you can park at the Chisos Basin campground (see below). If you want to get to this parking area, be advised that parking is very limited and turnover is slow, so we recommend arriving early or in the later afternoon for the best chance of finding a spot.
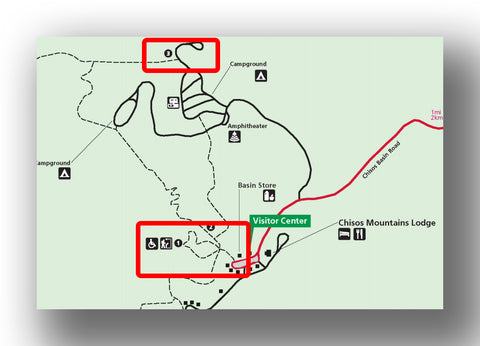
Window Trailhead Parking from the National Park Service
- Directions from the Chisos Basin Visitor Center to the Window Trail (this will take about 5 minutes and there will not be much in the way of traffic at all)
- Directions from Terlingua, TX to the Window Trail (this will take about an hour and you should plan on delays at the park entrance)
There is a bathroom right at the parking area at the campground and in the Visitor Center.
Since it was going to be a hot day and we were also packing in a visit to Santa Elena Canyon in the same day, we decided to take the shorter route down to the Window. While the longer route is more popular, we were glad that we saved our energy (and the time) for later in the day.
TRAIL SURFACE AND ACCESSIBILITY
- Trail surface. The trail is packed dirt for the first part of the trail before transitioning to rocks as you approach the wash. The rocks are very slippery in spots, so make sure you are extremely careful!
- Accessibility. The trail is not wheelchair accessible.
PREPARATION FOR HIKING THE WINDOW TRAIL
There are a few basics you’ll want to have on this hike:
- Water. This is not a surprise, but it is critical. Particularly for the return trip, having a large water bottle or a hydration pack is really important.
- Shoes. Hiking boots are not necessary on this trail, but shoes with good traction are really required due to the slippery rock.
THE HIKE DOWN TO THE WINDOW
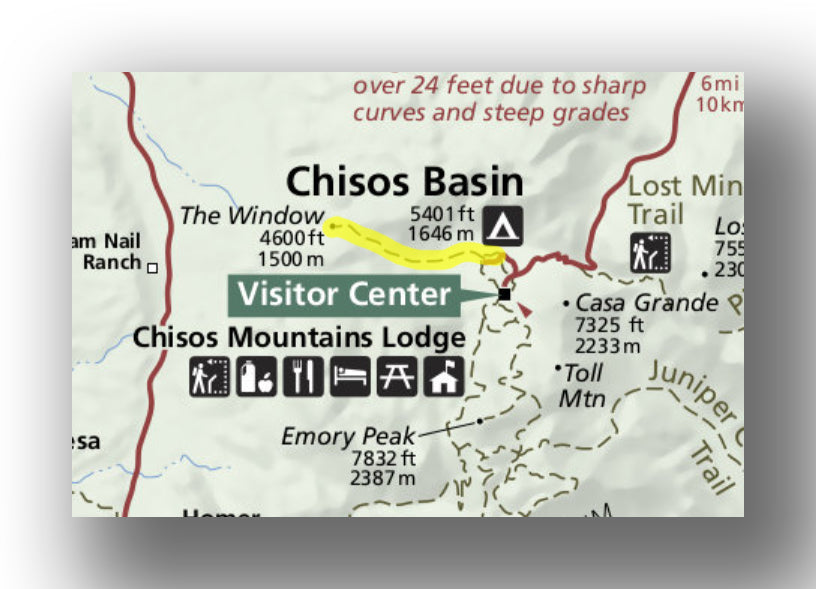
Window Trail map, courtesy of the National Park Service
After you get onto the trail, you start to descend immediately. Throughout the hike to the Window, you’ll head steadily downhill.

The trail is well maintained. While we were there, we saw several people working on the trail, including a crew that was removing graffiti from a hiker earlier in the month (note: he was caught and prosecuted!).

At the start, the dirt trail immediately is surrounded by a combination of brush, rocky hills, agave plants and cactus.
For the entire trail, you’ll catch views of the Window. Make sure you stop and take a few photos if you see a view you like. The angle of the sun can really change quickly, affecting how things look minute-to minute I the Basin. This is particularly true in the early morning or later evening hours.

After about 0.7 miles, the trail enters a grove of trees. Keep your eyes out for wildlife in here, as this is a great place to spot some of the unique birds that Big Bend is known for.

About 1.6 miles into the hike, the trail starts to head down a riverbed. During most of the year, this riverbed is dry (or with a few puddles). If you go during the rainy season, be ready, as you’ll likely be required to step over water (or even wade through it). Some of the steps (embedded right into the rock face) are steep or require hikers to stretch a bit as you move from rock to rock. It’s doable for family members of all ages, but just be sure to be careful as you navigate through here!


THE POUR-OFF
As the trail approaches the pour-off, be sure to keep a close eye on your kids and take your time. It is an understatement to say the rock is extremely smooth and slippery, so you’ll have to be really careful as it’s easy to lose your footing. However, don’t let this scare you away-it’s worth going to the end to take a look.

Since we began our morning early (we were on the trail at 7:00 AM), we had the pour-off to ourselves for about 10 minutes before other hikers started to show up. We enjoyed a quick snack before turning back up the trail on our way back to the campground.


THE HIKE BACK UP THE WINDOW TRAIL
Once we turned around on the trail, we quickly realized that we were hiking down the entire way to the Window and started to get a bit winded heading back. While the trail back to the campground isn’t steep, it is uphill the entire way. The sun was higher in the sky by this time, making it a bit hotter.
For some reason, the kids decided they wanted to try to find the smallest agave plant on the trip back, which made it go by fast without any complaining at all!
Overall, loved the hike on the Window Trail. We highly recommend it and plan on doing it again during our next visit!
WINDOW TRAIL: TOP LIKES AND DISLIKES
Likes:
- Great Payoff. The view at the end is really unexpected and is definitely worth the effort!
- Shade. This is one of the few trails in the park where it is partially shaded. This is from the trees in the basin, but if you go in the morning or late afternoon, the high walls may also help out.
- Unexpected Wildlife. We were surprised how much birdlife in particular we saw on the trail. We are not “birders” normally, but they were really interested to watch!
Dislikes:
- Footing. The rocks were really slick, so it made us a bit nervous with our kids. They were all fine-it’s probably just due to us getting a bit old!
- Downhill first. Let’s face it, when you are heading out on a trail, the thought of the views at the end help motivate you to go up the mountain in front of you. Being downhill first, it takes a bit more effort to get back to the trailhead!
THINGS TO DO NEAR THE WINDOW TRAIL
There are a ton of things to do in this area of Big Bend National Park. Some ideas include:
- The Chisos Basin Visitor Center is a great place to get an introduction to the park. It has exhibits and supplies. There are also many other things to do in the Chisos Basin area, so be sure you have at least a half-day in the area.
- The Lost Mine Trail is another fantastic hike. It is a bit longer (4.6-miles round-trip), but it is definitely worth checking out if you have the time.
- If you are not up for the Window Trail, the Window View Trail is an alternative worth exploring. It is 0.4-miles (round trip) and is a paved path that provides views of the Window. It is also suitable for wheelchairs.
OTHER TIPS WHEN HIKING THE WINDOW TRAIL
- Make sure you take plenty of water before you head out on the trail, as it is exposed for most of the hike and you’ll dry out quickly, particularly on the way back. Even when we hiked (in February), we found ourselves quite thirsty once we got back to the campground.
- We always recommend good shoes, but for this trail, hiking boots are not needed. However, we recommend having shoes with extra good traction to take on the slippery rock near the pour-off.
FURTHER BIG BEND NATIONAL PARK INFORMATION FROM JUST GO TRAVEL STUDIOS
- The Window Trail is one of several hikes covered in our 16+ page itinerary for Big Bend National Park.
- As you can probably tell, we loved this hike and this park. We think you will too, which is why we wrote our blog post on 5 Reasons Why You’ll Fall in Love with Big Bend National Park.
- Check out our blog on the Best Hikes in Big Bend National Park
- Another amazing hike in Big Bend National Park is covered in our blog on hiking the Lost Mine Trail. You won’t want to miss this one!
- In the remote Castolon Area of Big Bend National Park, you’ll have to check out hiking the Santa Elena Canyon Trail. This short trail puts you right on the border of Mexico and hikes through a beautiful canyon along the Rio Grande.
- If you are planning on camping in the park, check out our blog on the Best Campgrounds in Big Bend National Park.
- Only about 4 hours away are Guadalupe Mountains National Park and Carlsbad Caverns National Park. We offer detailed itineraries for both parks and they are both working checking out!
- We’ll work with you to create custom, vintage-style posters, postcards and note cards from your own photos, including those of Big Bend National Park. Check out our process!

ADDITIONAL INFORMATION ON BIG BEND NATIONAL PARK
- The National Park Service has a great website covering information on Big Bend National Park, including maps and lodging.
- Camping in Big Bend National Park is very popular. The campgrounds fill up quickly, especially in Chisos Basin.
- The Chisos Mountain Lodge is a perfect place to stay as a home-base in Big Bend National Park. The lodges are clean and the location is perfect ot allow you to get on the trails quickly.
- Trek Southwest has a ton of information on Big Bend National Park, covering both hiking trail and camping information. If you are looking for coverage on much of the park, they are a great reference!
- Mara from Rightkindoflost does a great job of covering an overview of what there is to do in Big Bend National Park.